Showing posts with label dinner. Show all posts

30 October 2015

Crockpot Gourmet Recipe: Stuffed Pumpkin

It's fall! And that means pumpkins! As you've probably guessed, I love pumpkin. I've already posted several pumpkin-based recipes on my site. (spaghetti sauce, chili, pumpkin custard) But one of our favorite fall meals is Stuffed Pumpkin. You can stuff the pumpkin with a variety of different fillings. This one, with cranberries and turkey, is like Thanksgiving dinner in a single dish.


You will need:
One pumpkin (about 7-8 inches in diameter, or whatever size will fit into your crock pot)
2 pound ground  turkey
Two onions chopped
2 tablespoons garlic
half cup Craisins
quarter pound mushrooms chopped
Half cup oats*
1 tablespoon each oregano and basil

Cut the top off the pumpkin and scoop out the seeds. Brown the ground turkey. Add the onions and sauté until slightly tender. Add the rest of the ingredients and cook until mushrooms are tender and onions start to caramelize. 

Pack as much of the filling into the pumpkin as you can, pushing it down with a spoon to really smash it in. (You will probably have some leftover filling. The amount depends on how big your pumpkin is. Extra filling makes a great topping for baked potatoes or omelets ... Or you can do as I did and just eat while you wait for the pumpkin to cook.) 

Replace the top of the pumpkin. Place in a crock pot, and cook on low for 6-8 hours until pumpkin is soft. 


This is a complete meal. You don't even need side dishes! 

* If you need your dish to be gluten-free, make sure you use certified gluten-free oats. Oats are a naturally gluten-free grain, but they are often grown and processed so that they are not safe for those with gluten allergies.

17 March 2015

Crock Pot Gourmet Recipe: Corned Beef and Cabbage

St. Patrick's Day is one of my favorite holidays. When I was a child, my mom always made Green Eggs and Ham for breakfast (with green milk to drink), we always wore green head-to-toe, and of course we had to have Corned Beef and Cabbage for dinner. Now, I know that Green Eggs and Ham are technically more fitting on March 2nd (Dr. Seuss' birthday) than March 17th, and that you can't even find corned beef in Ireland (it's an Irish-American tradition, not an "Irish" tradition), but for me, these things make St. Patrick's Day special.

My mom always simmered her corned beef in a large stock pot on low heat on the stove, but I've discovered that the Crock Pot is perfect for cooking a melt-in-your-mouth tender brisket.

You will need (approximately):
2 lbs. baby carrots
6-8 large potaoes (washed, but with skins intact)
2-3 onions
1 corned beef brisket (flat cut has a better flavor and texture than point cut - it's worth the extra cost!)
1-2 heads green cabbage

Cut the onions and potatoes in quarters, and place together with the baby carrots in the bottom of a 7-quart Crock Pot (for a smaller slow cooker, you can simply cut the recipe by a quarter, or even in half ... there are really no exact measurements here).

Place the corned beef, along with the included seasonings, on top of the vegetables.

Add about 3-4 inches of water. (When simmering on the stove, you generally fill the pot with water and boil the corned beef, but I've discovered that it's unnecessary to use so much water in the Crock Pot. You'll still get the tender texture of slow-cooked meat with much more flavor. However, if you like the broth, feel free to add more water as desired.)

Cook on low for 6-10 hours, until meat flakes apart with a fork.


In the last 45 minutes to an hour of cooking time, quarter the cabbages and place on top of the corned beef to steam lightly. (You don't want to add the cabbage too soon, as overcooked, mushy cabbage gets a bitter, unpleasant taste.) Cook just until the cabbage is slightly tender.

Serve with your favorite green drink. (We always opt for kool-aid.)

03 February 2015

Recipe: Cheese-Filled Tater Tots

As I'm sure you've noticed by now, I hate wasting kitchen space with single use appliances. So when I get a new toy for my kitchen, I have to come up with at least five new ways to use it (other than its intended use). And since my amazing friend Brenda gave me an electric cake pops maker for Christmas, I've been busily coming up with new and fun ways to use it. Today, I perfected the process for making delicious cheese filled tater tots in my cake pops maker.

You will need:
1 pound shredded potatoes
24 quarter inch cubes of cheese (any variety - you can even use vegan cheese, if you want to make these vegan-friendly!)
Nonstick cooking spray
Salt
Electric cake pops maker

In a large bowl, sprinkle a little bit of salt (and any other seasonings you desire)* onto the shredded potatoes. Microwave on high for 3 to 4 minutes, until potato shreds just start to stick together. Stir.

Allow potatoes to cool slightly. 

Take a pinch of the partially cooked potato shreds in your hand.  
Place cheese in the center. 
Press potatoes around the cheese and form into a tight ball, approximately the size of the holes in your cake pops maker. You want the balls to be big enough that they will come into contact with all of the cooking surfaces when the appliance is closed, but not so big that it's difficult to close the lid.
Place potato balls in preheated cake pops maker that is been sprayed with nonstick cooking spray. Close and let bake for 8 to 10 minutes. 
Let sit for an additional minute before removing from the cake pops maker. Serve warm.

*note: It is important to season the potatoes before forming into tater tots. The crust on the outside of the tots will keep the seasoning sprinkled on at the end from penetrating to the middle, giving you bland and flavorless tots.

Variation: omit the cheese entirely for simple, giant tater tots with essentially zero fat. (Without the cheese, these tots can fit vegan diets as well.)

This was my third attempt at making the tater tots in my cake pop maker. The first time, I tried doing it with raw shredded potatoes. They were delicious, but didn't hold together in tater tot form. Next, I tried cooking the potatoes before shredding them. They held the shape well but the texture was off. (More like crispy mashed potato balls.) It appears that the secret is shredding the potatoes first and then partially cooking them for maximum effect.

31 January 2015

Recipe: Better Than Spaghetti

A week ago, Peter Senftleben lamented on Twitter that he was trying to eat healthier, but a diet composed of mostly vegetables was a diet lacking in flavor. Of course, I had to jump in to assure him that many of my veggie-centric meals were not only delicious, but they were actually favorites for my carnivorous family. He didn't believe me, so I posted a picture of our dinner that night: Spaghetti Squash with a sauce of tomatoes, mushrooms and red bell peppers. (Bonus! This recipe is not only vegetarian, it's vegan friendly and gluten-free. And according to the recipe builder function on the fitness app on my phone, a giant serving of this dish comes in at less than 300 calories!) As promised, I'm sharing this recipe here today.


You will need:
1 large spaghetti squash
2 large red bell peppers, diced
8 oz. mushrooms, diced
1 (15oz.) can diced tomatoes
3 Tbsp. minced garlic
2-4 Tbsp. olive oil
1-2 Tbsp. Italian seasoning

Cut spaghetti squash in half, lengthwise, and scoop out seeds. Place, cut side down, on a plate with a half-inch or so of water on it, and microwave on high for approximately 12-15 minutes. Set aside to cool.

Meanwhile, in a large wok, heat up 1-2 tablespoons of olive oil. Add garlic. Sautee mushrooms in the garlic-infused oil. Add peppers and continue to cook until peppers are slightly soft (but not mushy!) (If vegetables begin to stick, you can drizzle in a bit more olive oil. Don't overdo it, though, or your healthy dinner won't be nearly as healthy!

Remove flesh from cooked squash (it will separate into strands resembling spaghetti noodles), and stir into the mushroom/pepper mixture. Sprinkle with Italian seasoning. Stir in one can of diced tomatoes (including the liquid) and continue to cook until it's all warmed through.

Serve. (We were super-hungry, so I divided the entire dish into five ginormous servings ... and at less than 300 calories, I didn't even have to feel guilty about the massive portion size. But for a normal dinner, this can easily make 8-10 servings.)

You can sprinkle with parmesan cheese, if desired (which would make it no longer a vegan meal), but it's delicious as-is.

03 December 2014

Recipe: Creamy Chicken Tortellini Soup


This soup is addictive! I made a big pot of it for my family, and it was gone within minutes, with everyone wishing they had more. Even though our bellies were full, we were all disappointed when the soup was gone. I actually made a second batch and put it in the fridge. (Everyone had soup for breakfast the next morning!) Now, every time I start chopping up carrots, my kids come running to ask "Are you making that delicious soup again??"

Creamy Chicken Tortellini Soup
For 12 large bowls full, you will need:
1/2 lb. carrots, chopped
1/2 c. dried, diced onions
2 Tbsp. minced garlic
2 Tbsp. chicken bouillon
1/2 tsp. cayenne pepper
1-2 tsp. oregano
1 1/2 c. cooked, diced chicken
2 (10.5oz) cans cream of mushroom (or cream of celery) soup
water
1 lb. fresh cheese tortellini (I used the tri-color variety)

Put chopped carrots and onions in a 5-quart pot, and add just enough water to cover the vegetables. Add chicken bouillon, garlic, oregano, and cayenne pepper. Cook on high 5-10 minutes, just until carrots are slightly tender. (Don't overcook! You don't want mushy carrots by the end of the process.)

Add cream soups, diced chicken, and enough water to fill the pot 2/3 full. Let simmer 10-15 minutes, to allow the flavors to develop.

Stir in pasta, and let cook 5-7 more minutes, until pasta has reached desired tenderness. Serve.


19 November 2014

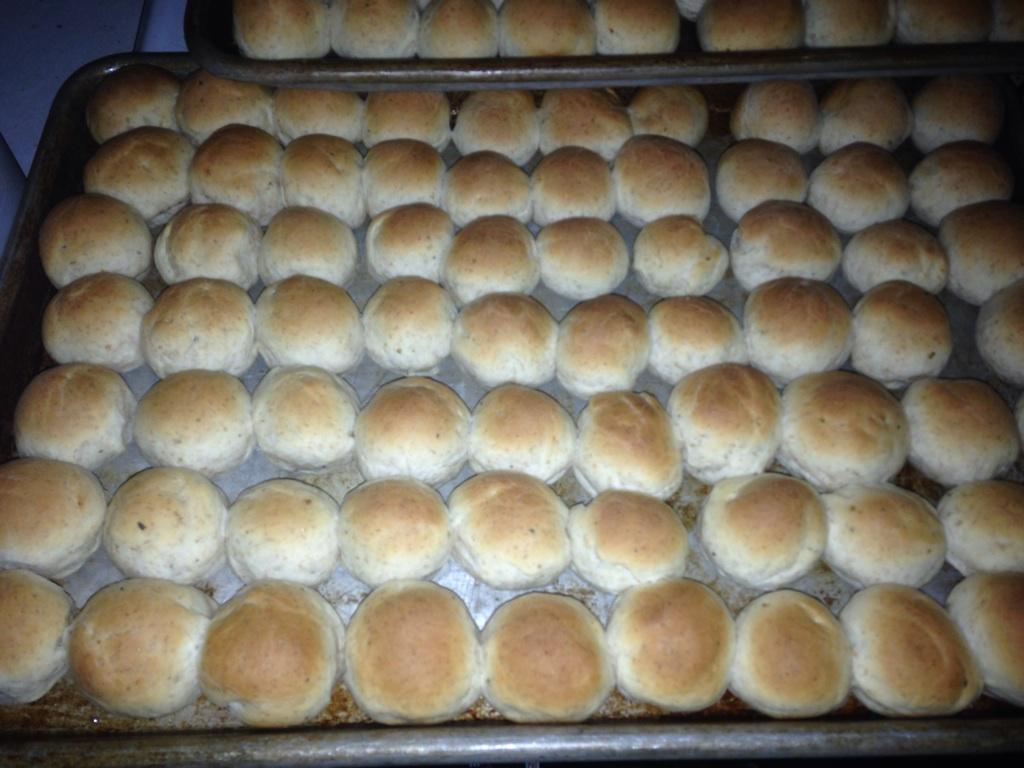
Recipe: 1-Hour Garlic Oregano Bread Bites

For special occasion meals, there's nothing better than fresh-baked bread. But I'm too impatient for hours of waiting for the dough to rise. These little rolls take almost no time to make. From start to finish, you can have fresh bread in about an hour. Perfect for your Thanksgiving feast!

Garlic Oregano Bread Bites

For approximately 6 dozen bread bites, you will need:
1 c. + 3 Tbsp. warm water
2 Tbsp. yeast
1/4 c. sugar
1/3 c. oil
1 tsp. salt
1 Tbsp. oregano
2 tsp. garlic powder
3 1/2 c. flour

In a large mixing bowl, combine water, yeast, sugar and oil. Let sit for 15 minutes.

Turn on oven to 400 degrees Fahrenheit.

Add salt, oregano, garlic and flour. Mix until a dough is formed and all flour is incorporated.

Turn out onto a floured surface and knead until smooth and elastic. (The dough should be no longer sticky, and you should be able to stretch it without it breaking immediately.)
OR
In your electric mixer, with the dough hook attachment, knead dough until smooth and elastic.

Shape into 1-inch balls and place on a greased cookie sheet. Dough balls should be spaced approximately half an inch apart to allow room for them to rise. Let sit in a warm place (like on top of the preheating oven) for 15 minutes.

Bake for 10-15 minutes, until rolls are golden brown. Serve warm.

24 July 2014

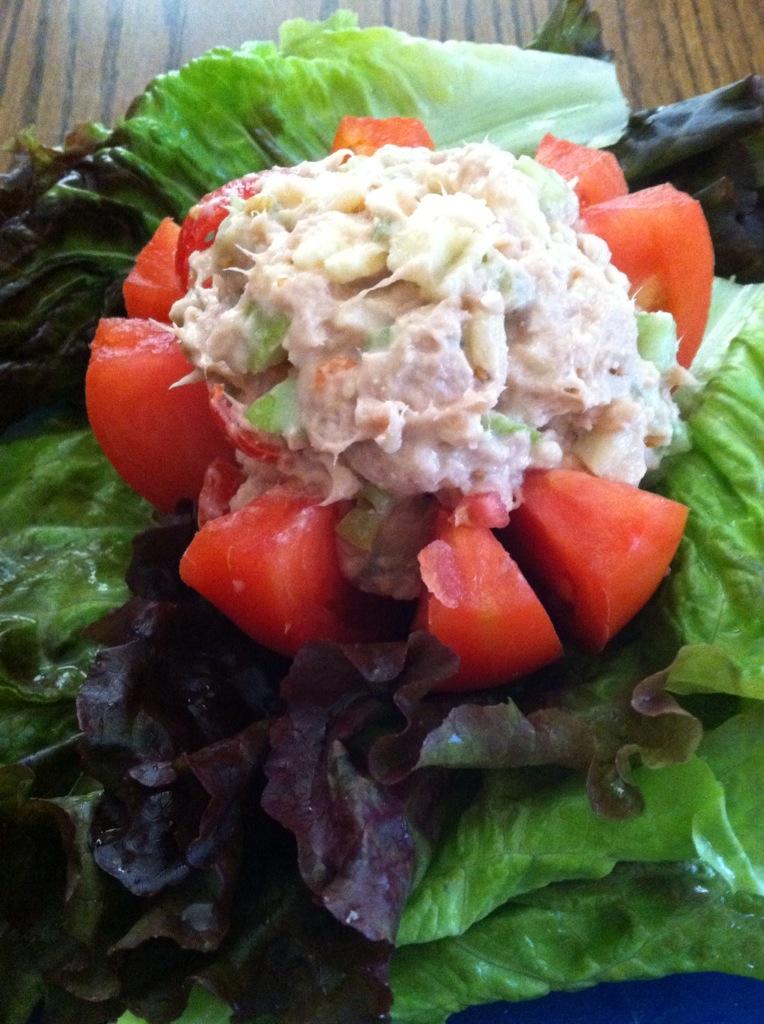
Recipe: Stuffed Tomatoes

A couple of weeks ago, author Rachel Harris challenged the members of her Flirt Squad to get healthy. This isn't about losing weight or dieting, or trying to fit some kind of arbitrary beauty standard, but about eating healthy foods and exercising, so we can feel good about ourselves. I promised to share some of my favorite healthy recipes with the group, so I've decided to share them with you as well.

Summertime is the best time for fresh produce and delicious, light meals. And if you don't have to heat up your house by turning on the oven, all the better, right? When the weather is warm and we want something fresh and flavorful, without cooking something elaborate, we really enjoy 

Stuffed Tomatoes.

This is a super-simple, healthy meal that is especially delicious this time of year, when garden-fresh tomatoes are plentiful. And it's easy to adapt to whatever ingredients you have on hand, so there's no need for an extra trip to the grocery store.

You will need:
1 head leaf lettuce (I like to use red leaf lettuce or romaine, but you can use whatever you have on hand. Or skip this ingredient if you don't have lettuce handy.)
6 large tomatoes
2 cans tuna fish (or diced chicken breast)
1-3 Tbsp. Miracle Whip, to taste (or mayonnaise, or plain yogurt)
1-2 tsp. mustard
1 c. chopped veggies/fruits (In the salad pictured above, I used celery, green apple, tomatoes, and green olives - other favorites include Craisins, grapes, onion, carrots, cucumbers, and zucchini.)
1/4 c. chopped nuts or seeds (This time, I used pine nuts. We also enjoy walnuts, pecans, or sunflower seeds sometimes.)
1/2 c. diced cheese (whatever flavor you prefer - I usually just use whatever I happen to have in the fridge)

In a medium-sized bowl, stir together tuna fish (I don't bother to drain mine. This way, I can use less Miracle Whip without having a dry tuna salad.), Miracle Whip, mustard, chopped veggies, nuts, and cheese.

Line 6 plates with lettuce leaves.

Cut each tomato into wedges, being careful not to cut all the way through, so the wedges are still connected.

Place a tomato into the center of each lettuce-lined plate and fan the wedges out to leave an open space in the center.

Divide tuna salad evenly between the tomatoes. Serve. (Prepare to have even your pickiest eaters asking for second helpings.)

24 March 2014

Twelve Days of TWELVE STEPS #1: Crock Pot Chili Cheese Fries Recipe

http://vbartles.com/12Teasers.htm

My daughter decided that, since my book is called TWELVE STEPS, we absolutely have to do something to celebrate the release for each of the twelve days leading up to the big day. So of course, we have lots of fun family celebrations planned, all linking to our favorite scenes and the lines that make us grin. However, as we were planning our activities, we realized that most of our celebrations only make sense if you've read the book. And we didn't want to spoil the surprise of our favorite scenes by explaining all of the inside jokes. But of course, we wanted to include all of you too!

So each day for the twelve days leading up to March 25, we'll be sharing non-spoilery favorite quotes with a new teaser graphic every day. And each day, I'll share something special and book-related with you as well: recipes, sneak peeks, giveaways and more!

http://www.amazon.com/Twelve-Steps-Veronica-Bartles-ebook/dp/B00ILMKZFO/ref=sr_1_2?s=digital-text&ie=UTF8&qid=1394648228&sr=1-2&keywords=twelve+steps

Andi lives by one simple rule: always maintain control of every situation. Thomas Jefferson is her hero, and she lives by the motto: "Nothing gives a person so much advantage over another as to remain always cool and unruffled under all circumstances." Every decision she makes, every step she takes, is calculated and precise. Right down to the way she eats. It's all a part of the persona she's constructed for herself.

Of course, you all know that food is one of my passions, but I (like most people) don't have the metabolism to eat like Andi every day and stay healthy. Still, every time I dive into Andi's story, I start craving delicious, but not so good for me fried foods and sweet treats. The compromise? Turn those not-so-healthy treats into something better!

Crock Pot Chili Cheese Fries
http://vbartles.com/recipes.htm

You will need: 
1 crock pot full of chili (try my Lentil Chili, or Chili with Pumpkin and Cranberries)
4 large russet potatoes
4 large sweet potatoes
2 Tbsp. olive oil
1 Tbsp. oregano
salt (to taste)
sharp cheddar cheese (or your favorite variety)

Cut potatoes and sweet potatoes into strips about 3/4-inch thick. In a large mixing bowl, toss potato strips, olive oil, oregano and salt together.


Transfer potatoes to a 5-quart Crock Pot and cook on high for approximately 2 1/2 to 3 hours. (You can also cook on low for 4-5 hours, but for this I like to cook for the shorter time on high, so the potatoes around the edges will get a little bit crispy.)

Serve warm with a generous topping of chili and your favorite cheese. (Or omit the cheese and use a meat-free chili recipe for a delicious vegan meal.)

Previous | 12 Days of TWELVE STEPS 

14 November 2013

Crock Pot Gourmet: Minestrone

Five years ago, in November 2008, I flew out to Maryland the week before Thanksgiving to sign the final paperwork on our house. My husband was overseas with the Air Force, and the kids had school (I divided them between several friends, who graciously agreed to take care of things for me), which meant I was doing all of the house-buying stuff on my own, armed with a Power of Attorney and a whole lot of faith.

I flew into Baltimore on Monday morning, and arrived at my realtor's office ready to sign the paperwork for my house at 10am. But there was a problem with one of the loan forms, and the bank didn't want to accept my signature (even though I had both a General Power of Attorney and several specific Special Powers of Attorney to allow for any issue that might pop up). They insisted that we had to get the form signed by my husband and faxed back to us before we could proceed. Coordinating overseas, with a major time difference, meant that the closing would have to wait until Tuesday evening.

My flight back to California wasn't until Wednesday morning, but I didn't have a hotel reserved, because I'd planned to buy an air mattress and sleep in my new house - and get a head start on the painting, etc. that I wanted to do before we officially moved to Baltimore in January. I went to the library down the street from my new house, to check my email and research hotels in the area. And there was an email in my inbox from an old high school friend, who had moved to the Baltimore area and wanted to get together while I was in town. She ended up inviting me to stay with her, so I wouldn't have to spend the night alone, feeling sorry for myself in a lonely hotel room. And in return, I offered to make dinner for her. But she'd just had her braces tightened, and said she didn't feel up to eating anything more substantial than soup.


No problem! I can make soup! Stacy's favorite was Minestrone, so I created this easy recipe for her. Now, every time I feel like life is beating me senseless, I make a big pot of Minestrone and remember the night when a dear friend reminded me that I was loved.

Stacy's Minestrone
(The original recipe was cooked on the stovetop*, but it easily converts to Crock Pot cooking.)
You will need:
2 (46oz.) cans vegetable juice (like V8)
2 (15oz.) cans dark red kidney beans (or approximately 3-4 c. cooked beans)
1 (15oz.) can diced tomatoes
1/2 large onion, diced
4 stalks celery, chopped
1/2 lb. carrots, peeled and diced
1/2 lb. green beans, cut into 1-inch sections
large handful dried oregano
2 tsp. garlic powder
1 Tbsp. rosemary
1/2 c. shell pasta (uncooked)

Place celery, onion, green beans, and carrots in the bottom of your 7-quart Crock Pot. 

 Add tomatoes, kidney beans, and vegetable juice.


Stir in oregano, rosemary and garlic powder.

 If desired, for extra flavor, chop the celery leaves (from the center of a bunch of celery) and add to the soup. (I always do this, because the celery leaves complement the oregano and rosemary deliciously.)
 Cook on low heat for 7-8 hours, until vegetables are tender. 30-45 minutes before serving, stir in 1/2 c. pasta. (You don't want to add pasta too soon, or it will get mushy.)

*Note: I like to make this in my Crock Pot, because I can put it in first thing in the morning and forget about it all day long, until just before I'm ready to eat. But if you don't have a Crock Pot, you can make this recipe on your stove instead. Simply put all ingredients (except the pasta) into a large pot and simmer until veggies are tender. (Make sure to stir frequently, as the tomato base will burn if left unattended for too long.) 6-8 minutes before serving, stir in the pasta and cook until tender. Serve as-is or topped with freshly-grated Parmesan cheese.

**Note 2: For Gluten-free diets, omit the pasta. And for my vegan friends, this soup is delicious without topping it with Parmesan cheese. :)

08 November 2013

Crock Pot Gourmet: Chili with Pumpkin and Cranberries

One year ago today, I had a Twitter conversation with Summer Heacock (@fizzygrrl), Emily McKeon (@ERMcKeon) and my now-agent, Jessica Sinsheimer (@jsinsheim) that kind of changed my life in a way I didn't expect. We were talking about food, and favorite pumpkin recipes (because pumpkin is the best ingredient ever and November requires creative pumpkin recipes). I mentioned my Crock Pot Pumpkin Souffle, and Summer, Emily and Jessica told me that I should be sharing my delicious recipes with the world. So the next day (one year ago tomorrow), I posted my first Crock Pot Gourmet recipes for Meatball Stew and Pumpkin Souffle. And the response has been overwhelming. In the past year, I've posted many other delicious Crock Pot creations, as well as some favorite recipes that can be cooked without a Crock Pot. Today, I'm celebrating this delicious anniversary with a mouthwatering Pumpkin Cranberry Chili.
 

 You will need:
2 lb. dry beans (or 8-15oz. cans of beans)
2 tsp. salt
2 tsp. garlic powder
2 Tbsp. chili powder
2 Tbsp. baking cocoa
1 large can pumpkin
1-5oz pkg of Craisins
2-15oz. cans diced tomatoes (I like the kind that have green chiles in them)
1 large onion, diced

I prefer to use dry beans when making chili for two reasons. First, I control all of the seasoning. I don't have to worry about my dish being over-salted, etc. And second, it's much cheaper. But if you aren't comfortable cooking with dry beans, or you don't have the time for these first steps, canned beans work just fine, and you'll still get a healthy, delicious dinner.

Wash your dry beans, and cover them with water. (The water should come up at least 2 inches above the top of the beans. You want them to stay submerged even after they've begun to expand.) Soak them overnight (or for at least 4-5 hours). I like to place the beans (still in the colander I used to rinse them) into a very large silver mixing bowl (or a clean and sanitized sink, if I'm using my mixing bowl for something else) filled with cold water.
 
When the beans have finished soaking (they'll probably be 2-3 times the size they were when you started), drain the water and rinse them thoroughly. (Soaking the beans in the colander makes it super-easy to do this.) Draining off the water you soaked the beans in and rinsing them before cooking makes the finished product less likely to cause gas. (Also, the more you include beans in your diet, the less likely they'll bother your tummy.)

Place the beans into your 7-quart Crock Pot (if you have a 3 or 4-quart Crock Pot, you can easily cut the recipe in half) with fresh, cool water. (Fill the crock until the beans are covered with 1/2 to 1-inch of water.)
 Add your cocoa, salt, garlic powder and chili powder.
 Cook on high for approximately 4 hours (or on low for 6-8 hours), until beans are tender.
 
The beans will continue to expand as they cook, and will look something like this:
 Add the tomatoes, Craisins, onion and pumpkin. 

You could, if desired, cook the onion with the dry beans in the first step, but DO NOT try to cut corners and add the tomatoes and Craisins early. If you add acidic ingredients to dry beans, you can cook them for hours and hours, and they will not get tender. If you're putting this chili together before work, and you won't be home during the day to add the acidic ingredients at around lunchtime, you can cook the beans overnight on low, so they'll be ready in the morning, or you can use canned beans (in which case, you would add the seasonings to the beans at the same time that you add the remaining ingredients).
 

I like to stir in the onion, Craisins and tomatoes first, then carefully stir in the pumpkin. (The extra juice from the tomatoes makes it easier to stir in the pumpkin.)
Continue to cook, on low, for 4-5 hours, or longer. Now that you've added the tomatoes and cranberries, you don't have to worry about the beans getting any mushier as they cook, so you can easily keep the chili simmering all day long, and the flavors will simply continue to meld together.

 Serve as-is (my favorite), or top with your favorite chili toppings (cheese, sour cream, corn chips...) 
We like to use the leftover chili the next day for things like Chili Omelettes and Chili Cheese Fries or served over the top of spaghetti noodles for a delicious Chili Sketti.


04 October 2013

Portabella Mini Pizza Recipe

Everyone loves pizza, right? A few months ago, I shared my recipe for pizza in the Crock Pot, which is absolutely delicious (and easier than you might think). We also love to have make-your-own mini pizzas for dinner when we're enjoying family movie night. When you make them yourself, pizzas are much more economical and healthier than delivery (and they usually taste better too)! And I'll share more of my favorite mini pizza recipes soon, I promise. But the last time I made mini pizzas, I started thinking about all of my friends on gluten-free diets. They deserve delicious movie-night treats too, right?

Presenting Portabella Mini Pizza!

For one pizza, you will need:

1 large portabella mushroom
1-2 Tbsp. cornmeal
1-2 Tbsp. pizza sauce (leftover spaghetti sauce works great!)
1/4 c. shredded mozzarella
Toppings of your choice (I used 1/4 red bell pepper, the mushroom stem, chopped, and 2 artichoke hearts)
Italian seasoning

Remove stem from mushroom and set aside. Wash mushroom cap and stem, and dry thoroughly. (It's best if you let it drain on some paper towels for an hour or two - these mushrooms can hold a lot of water, and no one likes a soggy pizza.) 

Preheat oven to 375 degrees Fahrenheit. Sprinkle 1/2 of the cornmeal on a baking sheet, and place mushroom (stem side up) on cornmeal. Sprinkle remaining cornmeal on top of mushroom cap. (This will help absorb the natural moisture of the mushroom.)

Spread pizza sauce on the mushroom "crust."

Sprinkle with 1/2 the shredded mozzarella.

Add toppings as desired, and top with remaining cheese and a dash of Italian seasoning.

Bake for 10-15 minutes, until cheese is melted and bubbly. Slice and serve.
*Note: For a Vegan version of this recipe, use a cheese substitute instead of mozzarella.

22 September 2013

Crock Pot Gourmet: Potato and Sausage Casserole

One of our favorite dinners doesn't actually have a name. Years ago, when my husband was cooking dinner (fried potatoes, smoked sausage and broccoli), my second-youngest daughter asked him "What are you making for dinner?" He showed her what he was making, and after she agreed that it looked really good, she asked again: "What's for dinner?"

Um.

Phil was totally confused. He'd just showed her what he was cooking.

"No, what's it called?" our daughter demanded.

"I don't know."

... Which is why this Potato, Sausage and Broccoli casserole is called 
"I Don't Know." 

This Crock Pot version is healthier than the original, as the potatoes aren't fried as they are in the original version, but it's just as delicious.

You will need:
8 medium potatoes
1 large onion
4 smoked sausages (approximately 12 oz)
2-3 Tbsp. minced garlic
2 Tbsp. Italian seasoning
2 lb. frozen, chopped broccoli

Spray your 7-quart Crock Pot with cooking spray. Slice half of the potatoes into 1/4-inch thick slices and spread on the bottom of the crock.

Chop up the onion and spread on top of the potatoes.


Add the garlic and sprinkle with half of the Italian seasoning and salt.


 Slice the remaining potatoes and spread on top of the onions. 
Sprinkle with remaining Italian seasoning and salt.


Slice the smoked sausages and layer on top of the potatoes.

 Top with chopped broccoli.

 Cook on low for 5-6 hours, until potatoes are tender.


24 August 2013

Crock Pot Gourmet: Pot Roast and Veggies

Pot Roast is one of the easiest Crock Pot recipes, but it's satisfying and delicious after a long day, especially as the weather cools and fall approaches, and you can cook the entire meal in one pot, which is always a bonus.

You will need:
1 roast (4-6 lb)
2 large onions
2 lb. carrots
2 lb. small red potatoes
1/4 c. dried mushroom pieces
1-2 tsp. salt (optional)
1-2 tsp. garlic powder
1-2 tsp. Italian seasoning
7-8 beef bouillon cubes
2-4 Tbsp. cornstarch (optional - to thicken gravy)
1-2 c. water

Quarter the onions and put in the bottom of a 7-quart crock pot.

Add mushroom pieces...


... and potatoes (you can cut them in half or quarter them if you like, but I prefer to leave them whole).

Peel carrots and cut into 2-inch chunks.

Put in Crock Pot with other vegetables.
 Add bouillon cubes, garlic powder, Italian seasoning, salt (if desired) and cornstarch (use more cornstarch for a thicker gravy and less for a thinner sauce).
 Place roast on top of veggies and add water.
 Cook on low for approximately 8 hours, until roast is cooked 
(check internal temperature with a meat thermometer).
Serve as is, or with warm rolls and a green salad.